Showing posts with label House and Home: Rennovation and Decor. Show all posts

Tuesday, April 15, 2014

Out With The Old: Demolishing An Outdoor Ceiling

With the brick wall underway, we realized we needed to tackle the rest of the porch project top-down*, literally. Clearly, the porch ceiling had suffered some water damage before we purchased the house, and we could not move forward with the project until we addressed the structural elements of the porch.

We began by pulling down the old ceiling and removing the old insulation. One of the aspects of this project I was most excited about was replacing the insulation. The bedroom above the porch stayed very warm in the summer and equally cold in the winter because of the old insulation. I am looking forward to having the guest room be a more comfortable space in our home.

After pulling down the old ceiling and the old insulation, we went rafter by rafter, removing large nails in the wood, and checked the lines of the beams to ensure they were straight and correctly supporting the room above.
We discovered one of the beams had absorbed a fair amount of water during the damage, and had begun to buckle, pulling away from the frame of the ceiling. This meant we would need to install a new beam alongside the damaged one, and secure the new beam to the porch frame.
Once the nails were removed, we took measurements for our new ceiling boards, insulation, and support beam, as well as made a list of finishing products we would need for completing the project. This included caulking, paint trays, paint brushes, and screws.
At least I come by my love of home improvement stores honestly, right? It is really a privilege to get to work alongside my Dad for projects like this. He is committed to getting the job done correctly, without short cuts, and on budget.

The next step is getting to work installing the new support beam.

-Domestic in the District 

*My Dad always uses a top-down policy for his projects. Essentially, you demolish from the top down and then rebuild from the top down, that way you don't end up having to undo any work you've already done. Example: if we painted the porch floor before we took down the old ceiling, the new paint job could potentially be knicked or damaged in the ceiling demolition or reconstruction.

Monday, March 31, 2014

An Iowa Find: West End Architectural Salvage

This weekend I traveled to Iowa to visit my amazing friend, Emily, who just had a baby!! She and her family live in Iowa right now, so I ventured to the Mid-West (for the first time) to meet her sweet little one, cook a few meals, and just be an extra set of hands around the house. One day, we drove to Des Moines to wander through West End Architectural Salvage after an amazing lunch at La Mie French Bakery.


 West End Salvage is a four-floor shop filled with unique and repurposed furniture, light fixtures, and various building, construction, and factory components.

 
Emily and I perused the warehouse while her little baby quietly slept. Being able to wander this shop with Emily was amazing, her home is a welcoming blend of farmhouse meets city. The granddaughter of a farmer, she lived in London for a stint before moving to the District. Her style reflects the influence of her time on her grandparents' farm blended with the enjoyment she finds from living in a busy modern city.
 The entry way to the warehouse.
 Brightly painted bin after brightly painted bin, all size 7.5. All I could think was these somehow belonged in an Anthropologie store window, or in a design studio of a designer participating in the CFDA Fashion Fund.

Being a salvage location, there were many pieces, including pews, clearly from old churches.  I have always thought it would be great to finish an old pew in outdoor paint and seal to use as a bench in a garden, especially if it were bleached for a white-washed look. That said, I'm really more focused on small-spaces and vertical gardening at our home in the District. Here in Iowa though, a girl can day dream about a large garden.
This mirror and frame were incredible. We both agreed the frame would be amazing in a color other than it's current shade of green. It was so large it easily would have been a floor-to-ceiling mirror for my living room back home.
The stairwell portrayed the warehouse perfectly, with the repurposed iron pipes serving as the handrail. Very industrial but with a sense of warmth and lightness of the creativity used throughout the space. 

West End Architectural Salvage also serves coffee and offers part of their space as a venue for events (I'm not kidding.) When Emily and I were there, a baby shower was being held in the cafe portion of the shop. 

If you find yourself in Des Moines, Iowa with a little time on your hands, stop by West End Architectural Salvage, and then get an Avocado Tartine from La Mie Bakery.

Here's to unexpected treasures and weekends with dear friends, 

-Domestic in the District

p.s. A special thank you to all the friends who so generously watched my son during the week days I was away and Ken was at work. I cannot sufficiently thank you. I am so very grateful for your friendship.

Wednesday, March 26, 2014

Painting an Exterior Door

A key part of making the back porch a more welcoming and usable space for our family was addressing the door to our garage, which can be seen from both the kitchen and the dining room windows. The garage entry door was in pretty rough condition following all the demo we've done in the house for the past two years. The garage (which is too small for a car)  has been our storage place for our demolition work between runs to the city dump, so the door has sustained a fair amount of wear and tear.  


While Ken worked on painting the railing and steps, I took the door to the garage off the hinges, laid it on my version of saw horses (And by that I mean old gallon paint cans. Actual saw horses are on my wish list.) Then using an old rag, I washed the surface of the door, being sure to remove all the dirt and mud from the crevices of the door. I also took this opportunity to tape-off the door knob and lock using blue painters tape. After the door was washed and dried, I simply applied an outdoor paint in thin coats. When using a brush to paint a surface like a door, it's helpful to use both a brush and a roller. The roller helps to provide a smooth texture to the paint, but you'll need the brush for the detail work as well as for the area around the door knob, lock, and the edges of the door. For the portion of the door using the brush, be mindful to avoid short choppy brush strokes, as that will increase the evidence of brush lines in the finished paint job. Follow the drying time listed on the paint can for dry time between coats, and for dry time once you are finished. Then, just slip the door back on the hinges.

Here's the finished product, using Behr's out door paint in Pelican Bay. 


Painting the door was a simple and inexpensive change that made a positive impact on the space. I love that the blue door can be seen from both the kitchen and living room. While the blue is different than the colors in either of those rooms, it is a good compliment to the interior of the house.

Next on the agenda is addressing the water damage in the ceiling, and replacing the bead board wall, which it turned out was also damaged. 

Any painting projects you're looking forward to getting underway?

-Domestic in the District

Tuesday, March 25, 2014

Back Porch Sitting...One Day

On this snowy end-of-March day, I thought I'd write about a project we started in the Fall, and are looking forward to finishing once Spring weather is here to stay! The end goal is to sit on our back porch with friends on a Summer evening enjoying a good meal and the evening breeze. A warm thought to hold on to for a day like today. 

In early October, we decided to get the first step of our back porch renovation underway before the temperature dropped. On a Saturday while our son slept, we prepped the porch for the work to begin. On our initial to-do list was to strip the paint off the brick wall, clean off and repaint the bead board wall, repaint the black wrought iron railing and steps, and paint the door to the garage. We are hoping to have this space in usable condition by mid Spring of this year.

First, a few before shots of the back porch, which has three walls, a set of wrought iron steps that lead from the porch to the dog leg next to our house, then into the garage: 
The wall to the left when you enter the porch from the kitchen.
The brick wall, which can be seen from the kitchen windows.
The ceiling, which obviously had some weather damage (and took an entire week to address- more to come on that soon.)

To get started, we came up with a list of an order of operations, to make the most use of our time. Starting with the paint stripper, which requires 24 hours to work its magic. Ken got to work applying the Citrus Strip, which you may remember is one of my favorite demolition/restoration products!
Once the Citrus Strip was applied (liberally and with an old paint brush and some gloves) We got to work using a flat black paint to repaint our iron banister and steps. Before starting this, I used steel wool to remove dirt, debris, and any rust on the stairs. It is especially important when working with exterior surfaces to be diligent to remove any loose material before painting. Otherwise, the new coat of paint will just flake, and all your work will be in vain.
Once the Citrus Strip cures on the wall for 24 hours, we will scrape it off (and the paint along with it) using this basic scraper and a gritty brush pad.


I think being mid-project is a great place to be, especially when the next step is clearly laid out. In this project, it was painting the door to the garage.

Here's to working on projects as time and life allows,

-Domestic in the District

Friday, March 21, 2014

WANTED: Modern Dining Room Art

Following a change in wall color (from Pratt and Lambert's Grape Hyacinth to Benjamin Moore's Cliff Side Grey) our dining room suddenly seemed incredibly neutral. And not in a good way.  

While on vacation with a friend whose eye for design I adore, I not-so-casually steered the conversation to brain storming how to add interest to my blank canvas of a room. We discussed utilizing vibrant color on a large scale to maximize the impact, while also keeping in mind that my home decor budget is a humble one. I left our conversation, and that vacation, with fresh inspiration to get to work on creating my own color fields for our dining room.

During one of my parents' visits to the District, I seized the opportunity for my Dad's help (and his pick up truck) to head to Home Depot to purchase the essential elements for the job, although I was not planning to get started right away.

What project doesn't kick off with measuring, a little math on a napkin, and a strong cup of coffee?
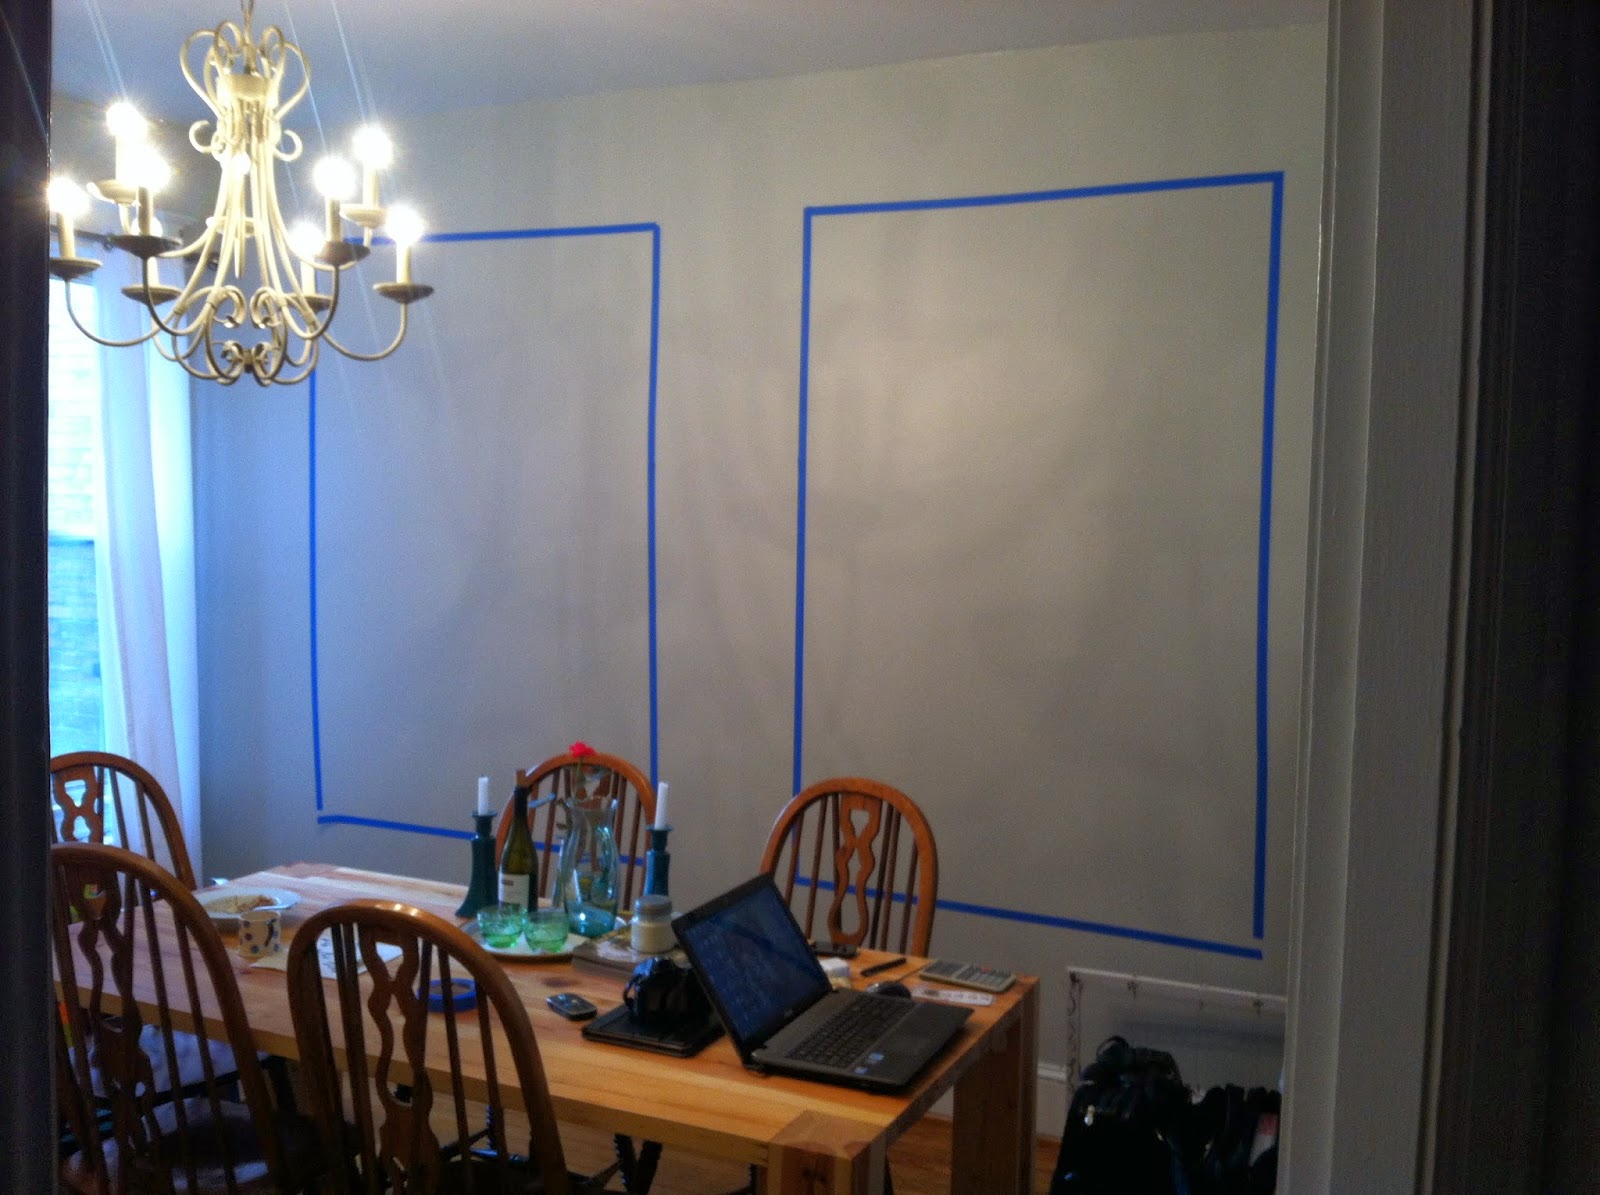
 Once I sorted through the numbers, I used blue painters tape to mimic the size of the paintings I was considering. This allowed me to determine if I liked the scale and placement. This can be an easy step in any project to skip over, but whenever possible, find a way to run a test or sample of the end results of the job, often it can save you from spending more time and money later to fix an avoidable error.

 Trips to Home Depot really do make me happy. After considering various options for the "canvas" of my paintings, I settled on interior-grade Lauan plywood, 3/16" thick. One of the biggest considerations for this project was the weight of the boards, as the walls of our dining room are plaster. By choosing a thinner plywood, I was able to get the size I wanted without exceeding the weight the plaster could support.

Other tools for this project included: 
3/16"x5-1/2" carbide tipped concrete drill bit (for masonry drilling)
1/4" Tap Con pan-head anchors  (to secure boards to the wall)
blue tape
trash bags
hand trough
joint compound 
paint brushes
primer 
paint key
paint 
paint stir sticks
disposable containers to mix colors
sharpee (to label the mixed colors)

 Using a hand trowel, I applied joint compound to the boards to help create texture for the finished product.
 Joint compound applied, I allowed it to set for 24 hours.

 Once the joint compound set, I applied a paint primer so the compound wouldn't soak in the paint unevenly. Then, I spent the week painting different layers and colors of paint, mixing colors and painting shades a top shades. Whenever the baby napped or went to bed, I pulled out my containers of paint, and pulled out my brushes. Turned on music, and just enjoyed painting.

Something my mom taught me about painting projects which require more than a few hours of work: If you are mid-project and have to stop painting, you can tightly wrap up your paint brush in a wet paper towel and plastic wrap, then put the wrap and brush inside a plastic bag. Squeeze the air out of the bag, seal shut, and stick the brush in the refrigerator. This allows you to pick up where you left off without going through the process of washing and drying your brush. This works well over night or for a day. Don't intentionally store your brushes this way long term. The best approach for caring for paint brushes long term is to properly wash and dry them between uses.
 After a week of layering and looking at the color fields in different light, I decided I was finished. I love the cheerfulness of the finished product. Of course, it won't surprise you to learn that I love Rothko's work. You can read more about his work, inspiration, and story here. You can also learn more about the color field movement here.

What custom art have you created for your own space? 

-Domestic in the District

Friday, October 12, 2012

Bright, White, and Grey: Kitchen Remodel Round Two

Thankfully the kitchen did not remain in it's "gut-job" state. In fact, a few short weeks after the demolition, we were just about ready to move back into the house. So what did we (er, our contractor) do?

The entry way to the kitchen was widened and the door to the basement was moved from the kitchen to the dining room. This allowed us to line the kitchen with cabinets and storage, maximizing the space.  We kept the original pressed-tin ceiling in the kitchen, which was one of the key selling points for us when we purchased our home a year and a half ago.  Before the work, the kitchen felt very dark in spite of having two large windows, so we also added a great deal more lighting and changed out the back door for a full-window (double paned and shatter proof) door. First we installed a spot light above the kitchen sink, then a series of three brushed-nickel barn pendants, as well as under cabinet lighting. One of our favorite features is the top row of glass front cabinets that have individual lights in each cabinet.
 
We went with white shaker style cabinets to keep the feeling of the kitchen classic and used bright substantial hardware to help the room feel updated and current. 
While the location of the sink stayed the same, we went with an as-large-as-possible apron front stainless steel sink for the remodel. I love that I can wash even my biggest pots and pans without a problem thanks to the immense dimensions of the sink. And who knows, we may be bathing our little guy in there in the days ahead! Of course, the dishwasher, where it all started, is still the highlight of it all for me. I cannot get over how much more functional our kitchen is with the dishwasher.
 I absolutely love this hardware. I actually saw it in another friend's kitchen and snapped a picture with my phone to forward to our contractor. I was so pleased that he was able to match them.


Here is our "peninsula"... not quite an island, but rather an extension of the Carrera marble counter top that provides room for meal prep or sitting and eating breakfast. All along I wanted the room to have a place for people to sit and stay a while if they wanted. This perfectly fits the purpose I had in mind, and I love that this can also serve as a place to set out drinks during a house party.  The backsplash is white penny tile, which you may recall is one of my favorite materials original to the house. This is not 100 year old tile, but it's the same material we found original to the house when we purchased it. The oven range hood is glass, which gives a more modern touch to the kitchen and demands less visual attention than a more typical stainless steel range hood.

To widen the entry way to the kitchen, we recessed the half bath wall 8 inches, which narrowed the half bath slightly. We have been amazed at how much the 8" added to the kitchen floor space helps make the room feel larger, and seems to draw people into the room. Of course, we were so thankful for the excellent condition of the original wood floor, so we simply refinished it with a dark stain, "Provencal" from Min-Wax. The color on the walls is "Wickham Grey" from the Benjamin Moore Historic Colors collection. The paint is the Sherwin-Williams Duration line.

It has been wonderful to move in, to figure out the best way to use the storage and the abundance of new counter space. Finishing touches are still in the works (ie installing roll-out drawers in the pantry) but we have been amazed at how much more we use our kitchen, and simply enjoy being in the space. 

We just cannot believe we get to use this kitchen every day. We love it, and are so thankful to have it done before Little Mister arrives. 

-Domestic in the District

Thursday, October 11, 2012

To Paint, Or Not To Paint? One Of My Favorite Questions!

I do love a good excuse to paint a room... or any excuse, really! Here are a few elements I have found important to keep in mind when choosing paint colors for your own space:


1. Purpose and Atmosphere:
Think through the feel of the house and the room specifically.  Understand how you want to use the space. Is it your dining room where you want to create an intimate conversation space to encourage people to sit and linger over a meal? Perhaps it's a child's room, which you desire to make bright and cheerful to inspire play and creativity while balancing the need for the room to be restful? Or maybe it's a kitchen in which you want to convey a sense of cleanliness, order, and warmth? Sort out what the room is to be used for and what atmosphere you want to convey with it.

2. Get Inspiration:  
Take a look at pictures of rooms or in others' homes that convey the type of sentiment you want in your room. This is a great excuse to spend a few minutes on Pintrest or pick up a copy of a home decorating magazine on your next trip to the grocery store (I especially love House Beautiful, they do a section in each magazine on different paint colors, where to use them, and what atmosphere they communicate.)

3. Samples Are Your Friend:
Make a trip to the paint store near you and look at swatches and order a few samples to take home with you. A few will be plenty, be careful not to give yourself too many options. Use the swatches at the store to narrow it down to two or three (at most) shades of the color you're looking for. More than that and it's too many options... and too many extra samples of paint you won't use.
How To: Paint samples onto the wall in large sections, on multiple walls, and in two coats. Let it cure for a few days and then look at it in the various lights throughout the day. Remember, a color can look one way in one room and in one type of light, and completely different in another room, so test your colors. Samples are your friend! 

5.  All Paint Is Not Created Equal
Pick the color and the finish you desire, but be sure to consider the quality of the paint, not just the price tag. Of course, stay within your budget, but don't reach for the cheapest paint available at your local store. I find that paint which is washable, although more expensive on the front end, lasts longer and therefore does not need the constant touching up or full repainting as often as lesser quality paint. I use Sherwin-Williams Duration or Emerald paint, because they can match any color from another company and the quality of the paint itself is excellent. Note: the Harmony and Emerald lines are fume-free, which means they are safe to use while one is expecting or has small children in the home during the day. Always keep a room well-ventilated while painting.

6. DIY or Call The Professionals?
I do love to DIY, especially when it comes to painting, since I want to pick out the color,  and finish, and I want it to look a certain way in the end. That said, there are certainly seasons in which the time spent doing a job is more valuable, so it's time to hire the professionals. 
So the questions to consider: 1. What is my budget? What is my schedule and timeline? 
Of course, there's also the question of if you WANT to paint yourself! One budget-saving tip: find a painter who will let you provide all the paints yourself, so they only bring the equipment they need to accomplish the job. The price-per-room will be lower that way, and you can insure you have the color and quality you want. Further, you may find you get a lower price-per-room if you have them paint more than one room while they are at your place. Part of the price you're paying is for them to travel to you, so maximize on their services while they are already there to paint one room. 

Hope that helps you get started! What paint projects are you contemplating? 

-Domestic in the District

Wednesday, October 10, 2012

Date Night: Crib Assembly

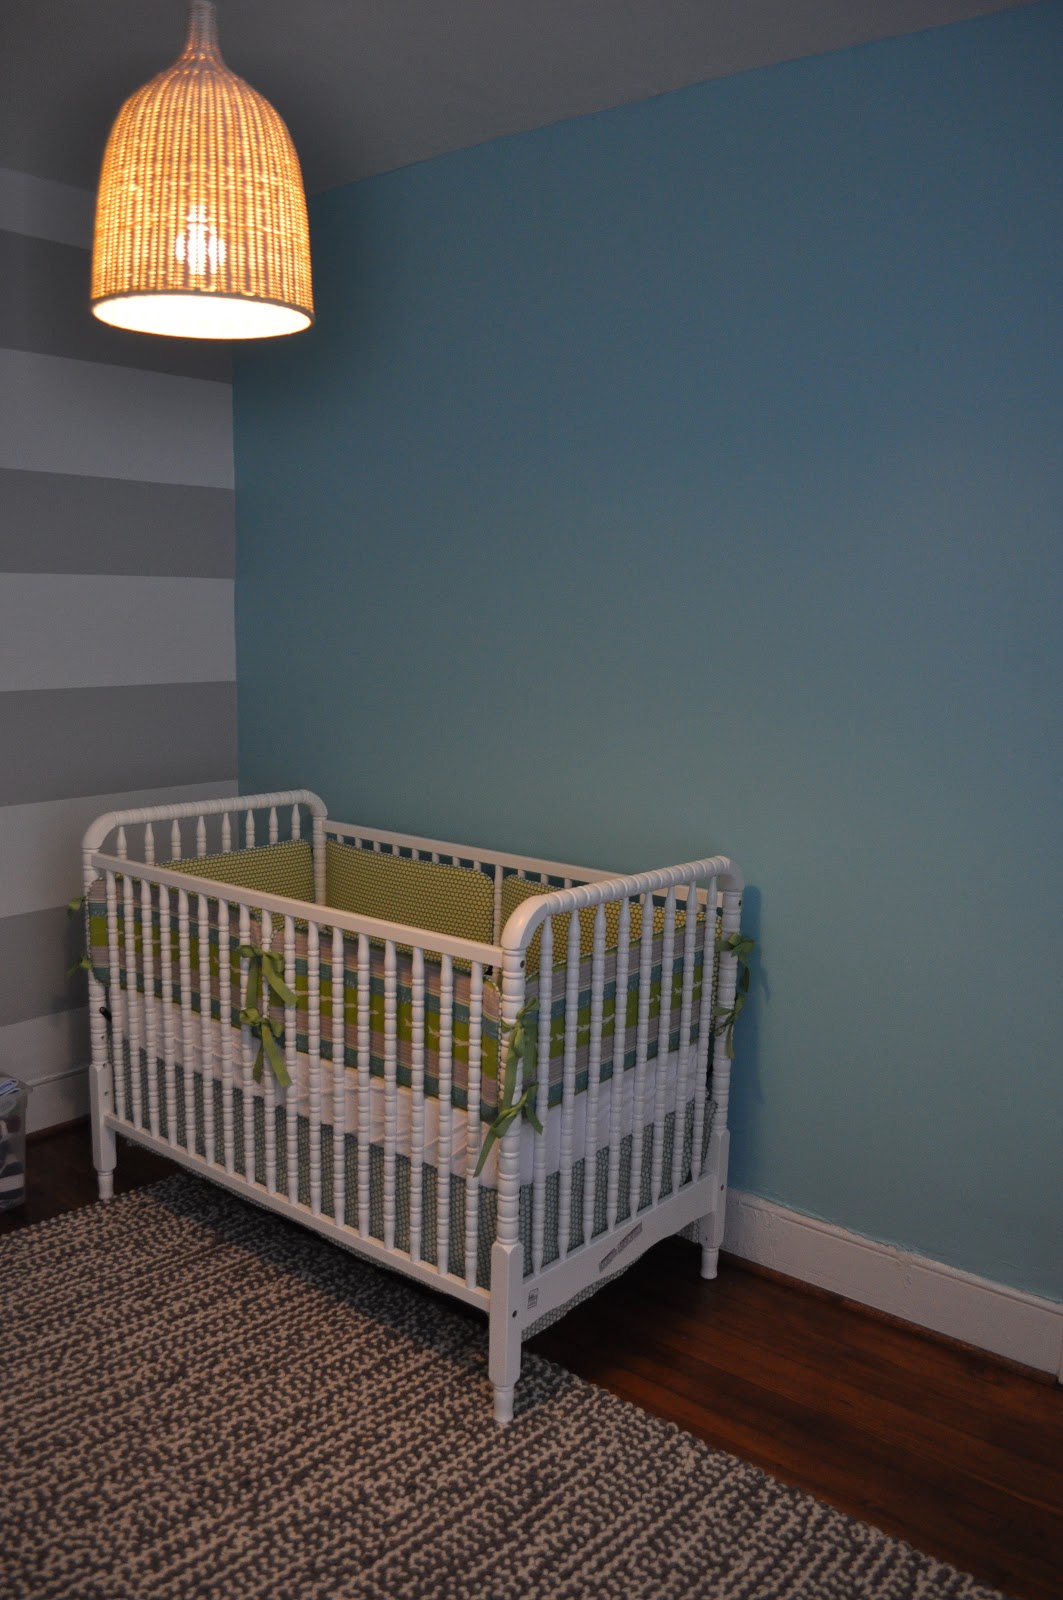
We are unbelievably excited for this little man's arrival, and we have been trying to get our ducks in a row before he gets here. One of the sweetest moments was Ken and I (ok, mostly Ken) assembling his crib- a special gift from my aunt and uncles!

 My mom and I painted the nursery a few weekends ago- such a project! I am hoping to do another post to explain the step-by-step process of painting stripes. It was so much work, but I am in love with the results!
 We are so excited about the crib, it's a Jenny Lind crib that's also converts into a toddler bed for when our little guy gets bigger. 
I couldn't resist putting the oh-so-soft blanket Ken's mom made and the "lovie" from Ken and I in the bed... and then it still seemed empty, so I put his "going home" outfit in for good measure... and then added the crochet carrot from Aunt Kari.
 An up close shot of the beautiful bumper pads and crib skirt my mom made- I love love love this fabric from Fabric Worm.
 Having the room in order makes it seem so real, even though it's hard to wrap our minds around what it will be like to become parents.

38 weeks down...

-Domestic in the District

Friday, September 28, 2012

In Search of a Dishwasher: Deciding to Renovate the Kitchen

We took the plunge! 

The kitchen renovation process honestly started with the realization that we spent about 5-6 hours a week hand-washing dishes. Dishwashers are certainly not necessary, but they really are not to be underestimated, not only for the time they can save, but also because of their ability to sanitize wooden spoons and baby bottles. So in the Spring, we asked an architect to draw up some renovation plans, then selected a general contractor for the job. While we love DIY house projects, the kitchen is a huge undertaking that needs to be done perfectly, and my DIY efforts are a bit more restricted these days. So after working to come up with drawings everyone was comfortable with, and choosing our contractor, Chris from CRR Construction, we settled on work to start late July through August. 

 
We tried to schedule the renovation for when we would be out of town for the majority of the work, and we planned to stay at the house in between work trips and vacations over the next 5 weeks. However, when Ken and I arrived at the house late one night from a week-long work trip to California, we quickly realized staying at the house might not be the best plan...
 

 {Yes, that is a box of pizza, paper plates, and plastic forks. Yes, we did eat it sitting on the wood trunk at the foot of our bed. No, we did not realize until after we finished that there was no trash can or trash bags in our kitchen to get rid of the (empty) box. Yes, our room smelled like stale pizza in the morning.}

So the next morning we "moved out" and stayed with friends in between traveling over the next few weeks. Ken and I are very thankful for the multiple families who let us crash in their guest bedrooms and shared their morning pot of coffee with us!

 
Demolition finished, and initial construction steps in place!
All the cabinets, the old refrigerator, and light fixtures removed, the only hold-over was our oven.
 Cords for the new lighting in place, doors removed in preparation for the half bath wall to be moved back 8 inches, and the door to the basement relocated from the kitchen to the dining room. This allowed us to maximize the cabinet/storage space in the kitchen.


More construction work to come...

What large-scale projects are you working on or considering tackling? 

-Domestic in the District


Monday, May 7, 2012

Blooms and Roots

The sunshine and warm weather have been the perfect excuse to pick up some plants to line our street tree box!
 I'm adding various colors of Petunias (I love their trumpet-shaped blooms... and their name!) And white Begonias. The bed already has purple and pink Verbena and a pink Crape Myrtle bush. The front bed gets direct light all day long, so it needs to be filled with hearty sun-loving flowers and greens.
Planning to get a couple tomato and hot pepper plants in the ground before the week is over...

What are you planting as Spring transitions to Summer? 
-Domestic in the District 


Thursday, May 3, 2012

Morning Wake Up Call: A Flooding Kitchen

 This morning, it looks like this:

I woke up this morning to Ken shouting my name and our alarm going off. Racing down the stairs and bursting into our kitchen to turn off the alarm, I realized why Ken had been calling for me. The hot water handle on our sink had been shot off by building water pressure, and now our kitchen was something like an up close experience with our own personal geyser. Honestly, who doesn't need an indoor water feature, right? 

Hot water was shooting all the way up to the ceiling, pouring over our counter tops, down the back of our cabinets, and all over our wood floor. Ken was in the basement trying to get the water turned off, while I held one of my dish-washing gloves and the sponge over the open faucet trying to minimize the damage. All the while, the water from the ceiling is creating an indoor rain-like effect all over our kitchen. 

Once the water was turned off, we began cleaning up. Thankfully inside the cabinets and atop the counter wiped up easily, as did the ceiling. The tricky part is that our wood floor seems to have really soaked up the water, so we've got our handy de-humidifier on the job. Ken is off to Home Depot to pick up a new faucet and handles for the plumber to install, and I'm on duty to make sure our version of Old Faithful doesn't decide to go off again. 

Here's to unexpected mornings, working together, and the joys of home ownership, 

-Domestic in the District

Wednesday, May 2, 2012

A Place For Cookbooks To Belong

 Where do you store your favorite cookbooks? Of course you need them to be accessible, but out of the way for once you actually get the cooking started. I found that stacking them on the counter top consumed too much valuable work space. 

You may remember a couple months ago when I posted about plans for spray painting a small shelf left in our basement by the previous owner...
Here it is! It turned out to be the perfect size for my cookbooks, cloth napkins, pot holders, our microwave (which was until recently sitting directly on the floor. very chic.) It also holds a small basket to keep the used cloth napkins until we made a trip to the washing machine in the basement. 


Above is an armoire I picked up on Craigslist to serve as our pantry and additional work space in our limited-counter space kitchen. Re-purposing old furniture you pick up at a garage sale, Craigslist, or may find stored in your basement/attic can be a great way to get unique pieces in your home that don't have to cost you much money (and I'm always in favor of that!) 

How have you found ways to make the most of your space?
-Domestic in the District

Tuesday, May 1, 2012

Weekend Projects and Office Upgrade

Last weekend was spent doing some of those small house projects that seem to individually be insignificant, but all together might as well be insurmountable. One of those projects was {finally} going through the last of the boxes from our move. The back bedroom has been earmarked for my office space since we moved in, but the pile of boxes and stacks of un-shelved books minimized the functionality of the room.


Going through the boxes, getting carpet tiles and a nice rug put down, and organizing my desk has meant big changes for me already this week! In fact, I'm blogging from my desk... in my office... sitting in my office chair! Now that the functionality has been dealt with, it's time to start thinking about decorating...

This room will be painted a warm white, and I am looking to recover some Gunlocke chairs I found on Craigslist- a set of 4 for $75. We discovered Gunlocke chairs when we were cleaning out the house and found one sitting in the basement. Ken and I both love their sturdy structure, and I am eager to get a more updated fabric on them, but of course looking for the fabric is part of the fun...
 Websites I'm perusing for fabric:

Lewis and Sheron Fabric
Discount Fabrics USA
Designer's Attic

Any online or local fabric shops you love to shop?

This is definitely an upgrade from the small spaces I've been used to

-Domestic in the District