Tuesday, April 15, 2014

Out With The Old: Demolishing An Outdoor Ceiling

With the brick wall underway, we realized we needed to tackle the rest of the porch project top-down*, literally. Clearly, the porch ceiling had suffered some water damage before we purchased the house, and we could not move forward with the project until we addressed the structural elements of the porch.

We began by pulling down the old ceiling and removing the old insulation. One of the aspects of this project I was most excited about was replacing the insulation. The bedroom above the porch stayed very warm in the summer and equally cold in the winter because of the old insulation. I am looking forward to having the guest room be a more comfortable space in our home.

After pulling down the old ceiling and the old insulation, we went rafter by rafter, removing large nails in the wood, and checked the lines of the beams to ensure they were straight and correctly supporting the room above.
We discovered one of the beams had absorbed a fair amount of water during the damage, and had begun to buckle, pulling away from the frame of the ceiling. This meant we would need to install a new beam alongside the damaged one, and secure the new beam to the porch frame.
Once the nails were removed, we took measurements for our new ceiling boards, insulation, and support beam, as well as made a list of finishing products we would need for completing the project. This included caulking, paint trays, paint brushes, and screws.
At least I come by my love of home improvement stores honestly, right? It is really a privilege to get to work alongside my Dad for projects like this. He is committed to getting the job done correctly, without short cuts, and on budget.

The next step is getting to work installing the new support beam.

-Domestic in the District 

*My Dad always uses a top-down policy for his projects. Essentially, you demolish from the top down and then rebuild from the top down, that way you don't end up having to undo any work you've already done. Example: if we painted the porch floor before we took down the old ceiling, the new paint job could potentially be knicked or damaged in the ceiling demolition or reconstruction.

Wednesday, April 2, 2014

Italian Memories and Cooking Abroad

For years I have been saying that for my next "milestone" birthday, I want to do a cooking school trip to either France or Italy with my friends for a week. Of course, I'm envisioning mornings spent chatting over piping hot coffee and pastries sitting in street-side cafes, then afternoons meandering the local market for ingredients, and finally, evenings standing in front of an old farm table preparing to cook, chopping vegetables, seasoning meats, and discussing the meal we will be enjoying together. 

Before the arrival of our Little Mister, Ken took me to Italy to celebrate becoming a family of three. It was amazing. One of the things we did was take a cooking class while we were in Florence, which was a surprise Ken arranged before we arrived. It confirmed my plan to do it again with friends one day. 

 Dusk in a small Florentine piazza. The streets, architecture, and city life were better than I even imagined. I found myself sort of getting lost and having a sense of belonging at the same time. The locals were welcoming and friendly, and didn't mind my feeble attempts to converse in Italian.
 A Florentine Market

 Waiting to speak with the butcher.
 Prepping and cooking together is one of my favorite things to do. Sharing a love for good food with the people who mean the most to me, there really is not much in this world better than that. 

Also, don't these aprons make us seem so official and so touristy at the same time?

 Fresh goat cheese raviolis in butter and cream. 
Tagliatelle with local beef in red sauce. This dish was my favorite, and I have attempted to recreate it at home a few times, especially on days when true comfort food is in order.

While I am not celebrating a milestone birthday this Summer, I will be next year. And, here's to hoping La Tartine Gourmande will be offering this Sicilian cooking course again. Her photography of food, scenery, local culture, and her daughter is an amazing blend of captivating, compelling, and calming. If you enjoy cooking and traveling, her blog is absolutely one to follow. But consider yourself warned, you'll read her blog and immediately need to eat and cook and book a plane ticket at the same time.

If any of you are already planning to attend this, or end up deciding to go, I would love love love to hear all about it!

Buon Appetito, 

-Domestic in the District

Monday, March 31, 2014

An Iowa Find: West End Architectural Salvage

This weekend I traveled to Iowa to visit my amazing friend, Emily, who just had a baby!! She and her family live in Iowa right now, so I ventured to the Mid-West (for the first time) to meet her sweet little one, cook a few meals, and just be an extra set of hands around the house. One day, we drove to Des Moines to wander through West End Architectural Salvage after an amazing lunch at La Mie French Bakery.


 West End Salvage is a four-floor shop filled with unique and repurposed furniture, light fixtures, and various building, construction, and factory components.

 
Emily and I perused the warehouse while her little baby quietly slept. Being able to wander this shop with Emily was amazing, her home is a welcoming blend of farmhouse meets city. The granddaughter of a farmer, she lived in London for a stint before moving to the District. Her style reflects the influence of her time on her grandparents' farm blended with the enjoyment she finds from living in a busy modern city.
 The entry way to the warehouse.
 Brightly painted bin after brightly painted bin, all size 7.5. All I could think was these somehow belonged in an Anthropologie store window, or in a design studio of a designer participating in the CFDA Fashion Fund.

Being a salvage location, there were many pieces, including pews, clearly from old churches.  I have always thought it would be great to finish an old pew in outdoor paint and seal to use as a bench in a garden, especially if it were bleached for a white-washed look. That said, I'm really more focused on small-spaces and vertical gardening at our home in the District. Here in Iowa though, a girl can day dream about a large garden.
This mirror and frame were incredible. We both agreed the frame would be amazing in a color other than it's current shade of green. It was so large it easily would have been a floor-to-ceiling mirror for my living room back home.
The stairwell portrayed the warehouse perfectly, with the repurposed iron pipes serving as the handrail. Very industrial but with a sense of warmth and lightness of the creativity used throughout the space. 

West End Architectural Salvage also serves coffee and offers part of their space as a venue for events (I'm not kidding.) When Emily and I were there, a baby shower was being held in the cafe portion of the shop. 

If you find yourself in Des Moines, Iowa with a little time on your hands, stop by West End Architectural Salvage, and then get an Avocado Tartine from La Mie Bakery.

Here's to unexpected treasures and weekends with dear friends, 

-Domestic in the District

p.s. A special thank you to all the friends who so generously watched my son during the week days I was away and Ken was at work. I cannot sufficiently thank you. I am so very grateful for your friendship.

Wednesday, March 26, 2014

Painting an Exterior Door

A key part of making the back porch a more welcoming and usable space for our family was addressing the door to our garage, which can be seen from both the kitchen and the dining room windows. The garage entry door was in pretty rough condition following all the demo we've done in the house for the past two years. The garage (which is too small for a car)  has been our storage place for our demolition work between runs to the city dump, so the door has sustained a fair amount of wear and tear.  


While Ken worked on painting the railing and steps, I took the door to the garage off the hinges, laid it on my version of saw horses (And by that I mean old gallon paint cans. Actual saw horses are on my wish list.) Then using an old rag, I washed the surface of the door, being sure to remove all the dirt and mud from the crevices of the door. I also took this opportunity to tape-off the door knob and lock using blue painters tape. After the door was washed and dried, I simply applied an outdoor paint in thin coats. When using a brush to paint a surface like a door, it's helpful to use both a brush and a roller. The roller helps to provide a smooth texture to the paint, but you'll need the brush for the detail work as well as for the area around the door knob, lock, and the edges of the door. For the portion of the door using the brush, be mindful to avoid short choppy brush strokes, as that will increase the evidence of brush lines in the finished paint job. Follow the drying time listed on the paint can for dry time between coats, and for dry time once you are finished. Then, just slip the door back on the hinges.

Here's the finished product, using Behr's out door paint in Pelican Bay. 


Painting the door was a simple and inexpensive change that made a positive impact on the space. I love that the blue door can be seen from both the kitchen and living room. While the blue is different than the colors in either of those rooms, it is a good compliment to the interior of the house.

Next on the agenda is addressing the water damage in the ceiling, and replacing the bead board wall, which it turned out was also damaged. 

Any painting projects you're looking forward to getting underway?

-Domestic in the District

Tuesday, March 25, 2014

Back Porch Sitting...One Day

On this snowy end-of-March day, I thought I'd write about a project we started in the Fall, and are looking forward to finishing once Spring weather is here to stay! The end goal is to sit on our back porch with friends on a Summer evening enjoying a good meal and the evening breeze. A warm thought to hold on to for a day like today. 

In early October, we decided to get the first step of our back porch renovation underway before the temperature dropped. On a Saturday while our son slept, we prepped the porch for the work to begin. On our initial to-do list was to strip the paint off the brick wall, clean off and repaint the bead board wall, repaint the black wrought iron railing and steps, and paint the door to the garage. We are hoping to have this space in usable condition by mid Spring of this year.

First, a few before shots of the back porch, which has three walls, a set of wrought iron steps that lead from the porch to the dog leg next to our house, then into the garage: 
The wall to the left when you enter the porch from the kitchen.
The brick wall, which can be seen from the kitchen windows.
The ceiling, which obviously had some weather damage (and took an entire week to address- more to come on that soon.)

To get started, we came up with a list of an order of operations, to make the most use of our time. Starting with the paint stripper, which requires 24 hours to work its magic. Ken got to work applying the Citrus Strip, which you may remember is one of my favorite demolition/restoration products!
Once the Citrus Strip was applied (liberally and with an old paint brush and some gloves) We got to work using a flat black paint to repaint our iron banister and steps. Before starting this, I used steel wool to remove dirt, debris, and any rust on the stairs. It is especially important when working with exterior surfaces to be diligent to remove any loose material before painting. Otherwise, the new coat of paint will just flake, and all your work will be in vain.
Once the Citrus Strip cures on the wall for 24 hours, we will scrape it off (and the paint along with it) using this basic scraper and a gritty brush pad.


I think being mid-project is a great place to be, especially when the next step is clearly laid out. In this project, it was painting the door to the garage.

Here's to working on projects as time and life allows,

-Domestic in the District

Monday, March 24, 2014

Monday Morning Craving: Papaya + Peanut Butter

During a trip to the Hawaiian Islands last November, we came across a local variation of the classic peanut butter + banana sandwich, and we fell in love. Since then, we have been working on perfecting our version of Island Vintage Coffee's Peanut Butter and Papaya Sandwich.

Using Walnut Raisin bread from Lyon Bakery, we toast a few slices at 350 for 3 minutes on each side.
Then, simply schmere oh-so-liberally with peanut butter. Drizzle the peanut butter with honey, and add slices of fresh papaya.  Enjoy immediately, as the peanut butter and honey melt into the warm toast.

Happy Monday Morning!

-Domestic in the District

Friday, March 21, 2014

WANTED: Modern Dining Room Art

Following a change in wall color (from Pratt and Lambert's Grape Hyacinth to Benjamin Moore's Cliff Side Grey) our dining room suddenly seemed incredibly neutral. And not in a good way.  

While on vacation with a friend whose eye for design I adore, I not-so-casually steered the conversation to brain storming how to add interest to my blank canvas of a room. We discussed utilizing vibrant color on a large scale to maximize the impact, while also keeping in mind that my home decor budget is a humble one. I left our conversation, and that vacation, with fresh inspiration to get to work on creating my own color fields for our dining room.

During one of my parents' visits to the District, I seized the opportunity for my Dad's help (and his pick up truck) to head to Home Depot to purchase the essential elements for the job, although I was not planning to get started right away.

What project doesn't kick off with measuring, a little math on a napkin, and a strong cup of coffee?
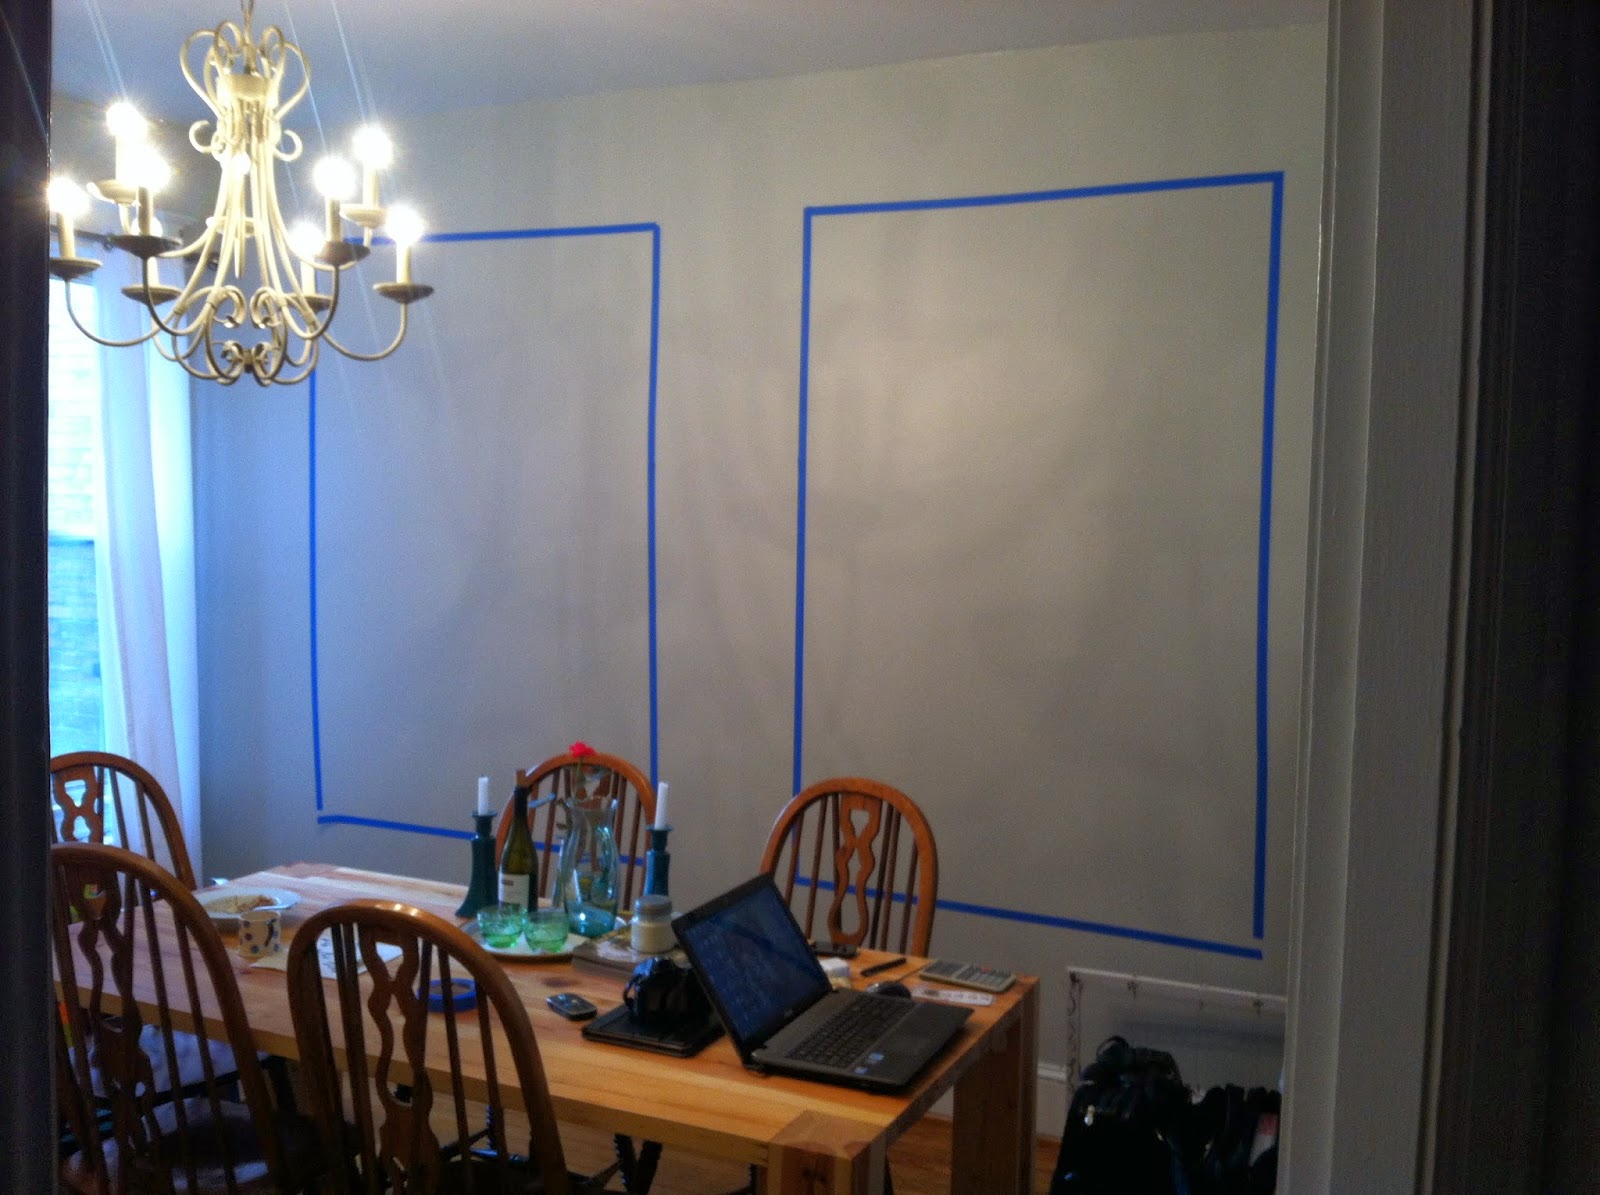
 Once I sorted through the numbers, I used blue painters tape to mimic the size of the paintings I was considering. This allowed me to determine if I liked the scale and placement. This can be an easy step in any project to skip over, but whenever possible, find a way to run a test or sample of the end results of the job, often it can save you from spending more time and money later to fix an avoidable error.

 Trips to Home Depot really do make me happy. After considering various options for the "canvas" of my paintings, I settled on interior-grade Lauan plywood, 3/16" thick. One of the biggest considerations for this project was the weight of the boards, as the walls of our dining room are plaster. By choosing a thinner plywood, I was able to get the size I wanted without exceeding the weight the plaster could support.

Other tools for this project included: 
3/16"x5-1/2" carbide tipped concrete drill bit (for masonry drilling)
1/4" Tap Con pan-head anchors  (to secure boards to the wall)
blue tape
trash bags
hand trough
joint compound 
paint brushes
primer 
paint key
paint 
paint stir sticks
disposable containers to mix colors
sharpee (to label the mixed colors)

 Using a hand trowel, I applied joint compound to the boards to help create texture for the finished product.
 Joint compound applied, I allowed it to set for 24 hours.

 Once the joint compound set, I applied a paint primer so the compound wouldn't soak in the paint unevenly. Then, I spent the week painting different layers and colors of paint, mixing colors and painting shades a top shades. Whenever the baby napped or went to bed, I pulled out my containers of paint, and pulled out my brushes. Turned on music, and just enjoyed painting.

Something my mom taught me about painting projects which require more than a few hours of work: If you are mid-project and have to stop painting, you can tightly wrap up your paint brush in a wet paper towel and plastic wrap, then put the wrap and brush inside a plastic bag. Squeeze the air out of the bag, seal shut, and stick the brush in the refrigerator. This allows you to pick up where you left off without going through the process of washing and drying your brush. This works well over night or for a day. Don't intentionally store your brushes this way long term. The best approach for caring for paint brushes long term is to properly wash and dry them between uses.
 After a week of layering and looking at the color fields in different light, I decided I was finished. I love the cheerfulness of the finished product. Of course, it won't surprise you to learn that I love Rothko's work. You can read more about his work, inspiration, and story here. You can also learn more about the color field movement here.

What custom art have you created for your own space? 

-Domestic in the District

Wednesday, March 19, 2014

It's Been Too Long...

How many times I have sat down to resume the chronicle of our lives and adventures... only to stare at a blank post page with a sense of having nothing to write. So, here's my first post since becoming a mom, and glad to be back!

The transition to motherhood has been a whirlwind, full of many highs (first smile, first laugh, early mornings just the two of us, first steps, a love for dogs and a love for food) and, honestly, some serious lows (sleepless nights, high fevers, ear infections, and teething.) We have learned so much as a family, and are so grateful for the gift of being a "party of three" now.  Here is a brief photo year-and-a-half-in-review!
 

-Domestic in the District